
Best used for sloping driveways, sidewalks, pool patio’s, and brick or cement decks that slope toward the house.
Apple Drains
Orlando FL
321-200-0685
For faster Service please use our Service Sign Up
Note: Working in concrete is actually a very clean install. We have the right tools for the right job and you will know..
We’ll Make It Right
The First Time!


Depending on the driveway grade and depth of the garage floor, sometimes a sump pump is needed to lift the water to high enough for gravity to take over. Sometimes there is a downhill run to one side or the other of the driveway and we just need to dig a trench from the the channel drain and install some drain pipe out and away from the area.
Most of the time when Apple Drains arrives at a home in need of a driveway channel drain, its because the slope of the drive is very steep and lots of water floods out the garage when it rains.
The first step is to cut out the concrete across the driveway. We use a concrete saw with a diamond blade to cut the concrete. (sometimes called a partner saw)

We cut across the drive using the concrete saw from one side to the other.

Be sure to let the water run slowly from a garden hose or else you’ll have a dusty mess like this..

We need to cut TWO times across the driveway for the channel drain. The width can vary, but the trench after the concrete is cut and removed needs to be about 12″ wide. This gives enough room for to re-pour the concrete on both sides of the 5″ wide NDS channel drain. The concrete saw is a great tool. But like anything else, it takes time to cut concrete. The saw cuts about 1 inch every minute. So on this driveway, we are cutting both a little over 52 feet which means it takes just over and hour to make the cuts.

Next come the Jack Hammer. This is also a great tool for breaking up concrete. We use a 70 lbs hammer that easily breaks up the concrete. (well by easily we mean its better than using a sledge hammer)
The Jack Hammer works well, but it makes LOADS of debris and Rubble. This will have to be hauled away and taken to the dump. (note: remember we at working at the bottom of a very steep driveway. All this debirs has to be lifted and wheel barreled back up the hill to the trailor).


Now that we have broke up the concrete, we need to use a Pry Bar to break free the remaining concrete from out trench. You’ll notice there is a old Corrugated drain pipe buried in the concrete. This was an downspout drain drain line that we will have to re-connect, which means our trench will have to be even deeper.
The Rubble!


After all the rubble is removed we dig the trench down a little deeper and Repair the old Corrugated pipe with solid PVC. Then we cover the pipe with a base to give the NDS Channel Drain a good solid surface that runs down hill to the storm drain we repaired. On this install, we used dry quikrete the base. This was because the driveway was 8″thick! (a bit over kill but since the old Downspout Drain is under here too, we encased it in concrete like the original pour.
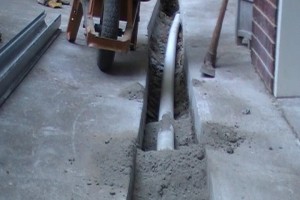
Next we lay out the NDS channel drain in our trench and connect. This channel drain comes in 10′ sections so we had to use a couple of couplings. NDS makes all the fittings for their product. ( a quick note: Although NDS and other manufacturers do a great job of making product, the true test of their material comes from the adaptation of its use in everyday installations. We do like NDS! We have always been able to modify their material to fit the need of the job!)

Now we check for grade. We want to make sure the channel drain is ever below the finish re-pour of concrete. We just use the trowel to double check. If the trowel touches the top of the channel drain, then we need to lower that section, but it all good here.

Next we set the grates in place. We do this all the way down the channel drain so that when we re-pour the concrete, the grates keep the channel from collapsing.
 Then we wet down and wash the entire area. This so the concrete will not stick to the driveway and it won’t stick to the grates on the channel drain. This is an important step. it will save hours of clean up!

Finally, we re-pour the concrete and trowel it into the trench along side the channel drain.

Using the trowel we finish off a nice smooth surface.
The last thing to do is spray off the grate where any concrete is left. It will come right off since we wet the surface as shown and described above!

NDS CHANNEL DRAIN INSTALL. How to install a channel drain…
cutting the concrete ,
jack hammer it out,
trench the channel,
install the cannel drain with grates,
and repour cement!
Call Us For Free Estimate
Apple Drains
Orlando FL
321-200-0685
For faster Service please use our Service Sign Up
(321) 200-0685
(704) 309-8880
Tags: Orlando Fl, ADS, apple drains, CATCH BASIN, CHARLOTTE, Concrete cut, CRAWL SPACE WATERPROOFING, DOWNSPOUT DRAIN, DRAINAGE, driveway, driveway channel drain, flooded garage, Grate, GRAVEL DRAIN, install, jack hammer, low spot, NC, NDS, NDS Channel Drain, patio drain, PVC, side walk, steep driveway, STORM DRAIN, SUMP PUMP, Micro Drain
We'll Make It Right
The First Time!

Orlando FL
Service / Estimate Sign Up
Charlotte NC
Service / Estimate Sign Up
Complete Home Repair
Apple Drains Orlando
North Florida,
Central Florida
West Coast
Apple Drains Landscaping
Decks,
Flower Beds,
Design
New Shrubs
"The Weed Man"
Weed Control,
Maintenance Service,
Handyman Services,
Kitchens, Bathrooms,
Carports,
Gutters, French Drains
Service Areas
Orlando
Tampa
Jacksonville
St Augustine
Ocala
Gainesville
Ormond Beach
Palm Coast
Daytona

Apple Drains
Drainage Contractors
Trusted and Recommended
by Your Neighbors
(321) 200-0685
For faster service, please use our
Service Sign Up
its the faster way to get service
About the author